How to Give Your Agentic Applications Persistent Memory with CopilotKit's Enterprise Intelligence Platform
Introduction
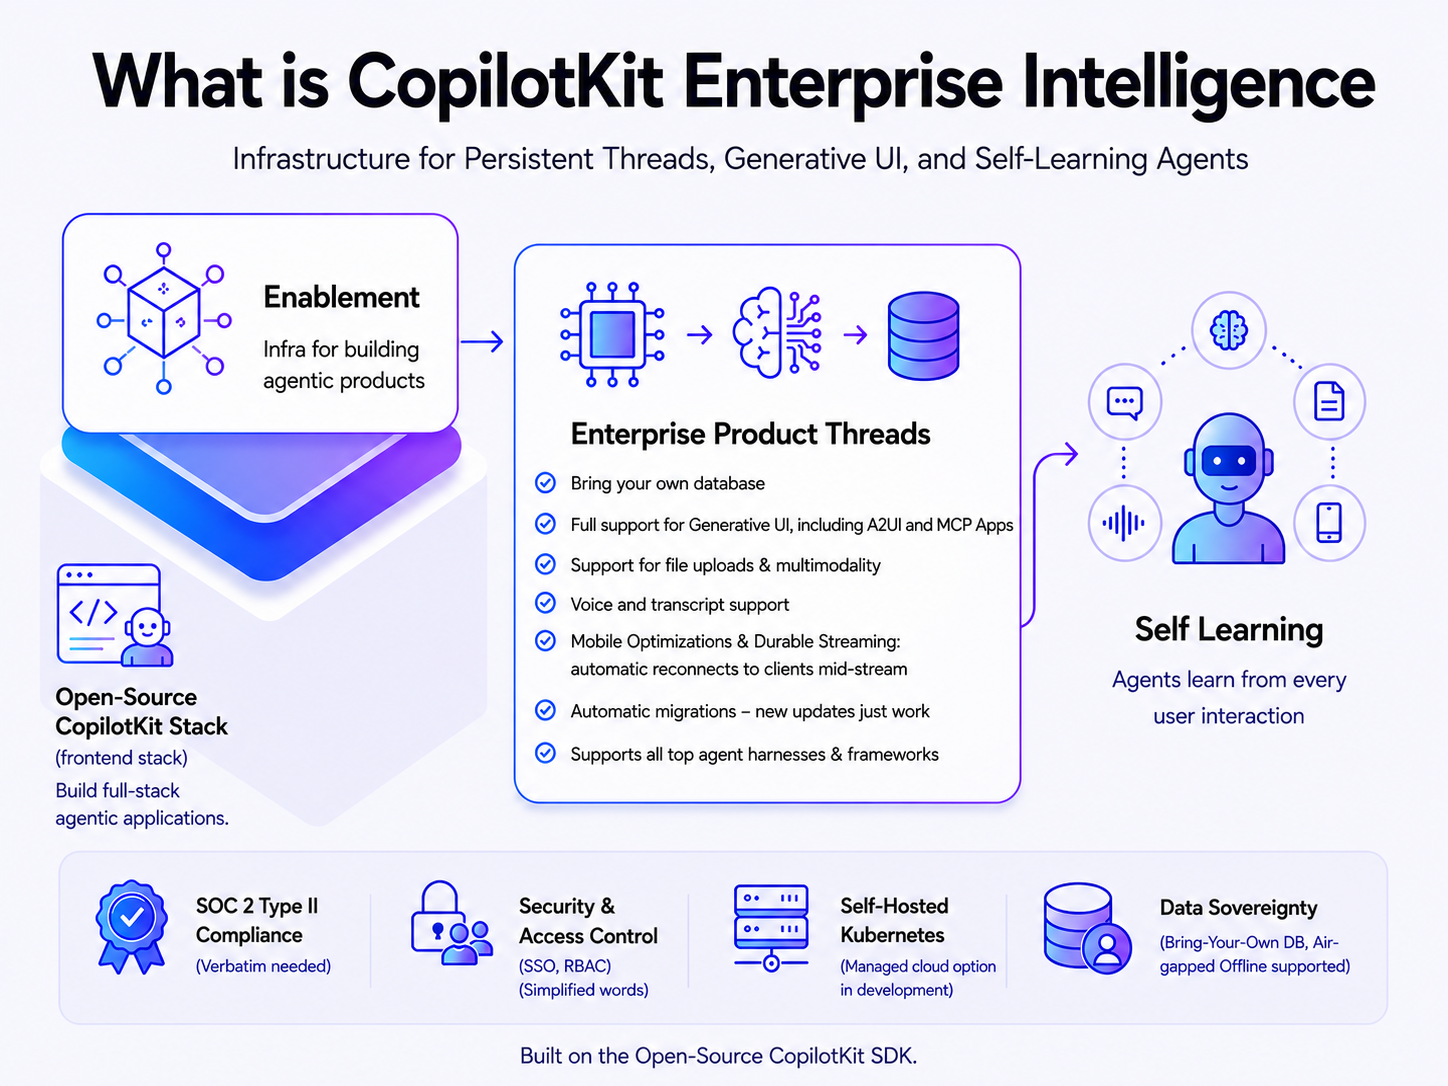
Agentic applications are powerful, but they suffer from a fundamental flaw: every new session starts from scratch. Past conversations, ongoing workflows, and decisions made are all lost when the session ends. Developers have traditionally had to build a custom storage layer—selecting a database, serializing state, managing session IDs, and wiring it into the agent runtime—before even writing product logic. CopilotKit's Enterprise Intelligence Platform solves this by providing a managed infrastructure layer that automatically handles state and memory across sessions and devices, regardless of the agent framework. This guide walks you through integrating that persistent memory into your own agentic apps.
What You Need
- A working agentic application built with any major agent framework (LangChain, CrewAI, AutoGen, etc.)
- CopilotKit SDK installed in your frontend (React/Next.js recommended)
- Access to CopilotKit Enterprise Intelligence Platform (self-hosted on Kubernetes or managed cloud – contact CopilotKit for credentials)
- Basic understanding of session management and state serialization
- For self-hosted: A Kubernetes cluster and your own database (optional, but gives full data sovereignty)
- Node.js 18+ and npm/yarn for SDK integration
Step‑by‑Step Guide
Step 1: Assess Your Memory Requirements
Before adding persistent memory, define what your application needs to remember. CopilotKit's Thread primitive captures not just text, but the full interaction surface: user inputs, agent responses, intermediate tool calls, UI state changes, workflow progress, and decision points. Identify which of these categories matter for your use case. For example, a customer support agent may need to remember the user's account history and previous tickets across sessions, while a code assistant might need to retain the current file context and recent edits.
Step 2: Install and Configure the CopilotKit SDK
Add the CopilotKit packages to your frontend project. If you already have the open-source SDK, you only need to enable the Enterprise Intelligence features. Run:
npm install @copilotkit/react-core @copilotkit/react-ui @copilotkit/enterpriseWrap your application with the CopilotProvider and pass the Enterprise configuration object, including your API endpoint (self-hosted or cloud). Example:
import { CopilotProvider } from "@copilotkit/react-core";
const config = {
  apiUrl: "https://your-copilotkit-instance/api",
  enterprise: {
    memoryType: "persistent",
    threadIdPrefix: "app-"  // optional
  }
};

function App() {
  return (
    <CopilotProvider config={config}>
      <YourApp />
    </CopilotProvider>
  );
}
This automatically hooks the SDK into the Enterprise Intelligence backend.
Step 3: Choose Your Deployment Model
The Enterprise Intelligence Platform supports two deployment options:
- Self‑hosted on Kubernetes – You run the platform in your own cluster. You can bring your own database (PostgreSQL, MongoDB, etc.) to store threads and state. This gives you full control and data sovereignty.
- Managed cloud (in development) – CopilotKit hosts the infrastructure for you. Ideal for teams that want to avoid operational overhead.
For this guide, we assume self‑hosted. Deploy the Enterprise Intelligence service using the provided Helm chart. Configure environment variables for database connection, encryption keys, and SSO settings if needed.
Step 4: Implement Threads as Your Persistent Session Primitive
Threads are the core building block. A Thread is a first‑class persistent session object that survives across users, devices, and agent runs. Unlike a simple array of messages, a Thread captures the entire interaction surface: user inputs, agent responses, tool calls, UI state, workflow progress, and decisions. Integrate Threads by:
- Creating a new Thread when a user starts a new session (e.g., via
CopilotKit.createThread()) - Associating the Thread ID with the user (store it in your backend or use a cookie/localStorage)
- On subsequent visits, retrieving the existing Thread ID and resuming from where the user left off
Your agent runtime automatically reads and writes state to the Thread. No manual serialization needed.
Step 5: Connect Your Agent Framework
CopilotKit Enterprise Intelligence works with any agent framework. It uses a thin adapter that maps your agent's state to the Thread structure. For example, if you use LangChain, import the CopilotKitCallbackHandler:
from copilotkit.langchain import CopilotKitCallbackHandler

handler = CopilotKitCallbackHandler(thread_id="thread-123", api_url="https://your-instance/api")
agent = create_agent(llm, tools, callbacks=[handler])
The handler syncs agent memory (conversation history, intermediate steps, tool outputs) to the Thread automatically. Similar adapters exist for CrewAI, AutoGen, and others.
Step 6: Configure Security and Compliance
For enterprise deployments, enable the following (if required):
- SSO – Integrate with your identity provider (Okta, Azure AD) for user authentication.
- Role‑Based Access Control (RBAC) – Define who can view, edit, or delete Threads.
- Encryption at rest and in transit – The platform uses industry‑standard encryption.
- SOC 2 Type II compliance – Already certified; your deployment inherits these controls if self‑hosted according to provided security docs.
- Air‑gapped deployments – If offline is required, use license key validation and host entirely within your network.
Step 7: Test Across Sessions and Devices
Simulate real‑world usage:
- Start a session on Device A, have a multi‑turn interaction (include tool calls and UI state changes).
- Close the session and open a new one on Device B with the same user; the agent should resume the previous conversation.
- Verify that workflow progress (e.g., a multi‑step configuration wizard) continues from where it was halted.
- Check that the Thread persists even if the agent framework restarts or the underlying LLM changes.
Use CopilotKit's dashboard (provided with the platform) to inspect Thread contents and debug any state inconsistencies.
Tips for Success
- Start with a narrow scope: Implement persistent memory for one critical workflow first (e.g., user onboarding). Expand later.
- Leverage the six categories of interaction: Threads capture user inputs, agent responses, tool calls, UI state, workflow steps, and decision points. Map these to your domain for richer context.
- Handle Thread cleanup: Define policies to archive or delete old Threads to manage storage costs.
- Use the self‑hosted option for data sovereignty: If your application deals with sensitive user data, bring your own database to keep everything under your control.
- Monitor performance: The platform includes metrics on memory retrieval latency. Optimize by indexing frequently accessed Thread fields.
- Keep your SDK updated: CopilotKit releases automatic migrations, so upgrades are friction‑free.
With CopilotKit Enterprise Intelligence, you eliminate the burden of building custom memory infrastructure. Instead, you focus on product logic—knowing that every session, on every device, picks up exactly where the user left off.
Related Articles
- Microsoft Rushes Emergency Patch for ASP.NET Core Flaw Allowing Full System Takeover on Linux, macOS
- Apple Insider Reveals Tim Cook Succession Date, iPhone Air Battery Revolution, and Foldable Future
- Anchorage Digital and M0 Launch Joint US Stablecoin Issuance Platform for Enterprises
- Kubernetes v1.36: Everything You Need to Know About the Haru Release
- How to Get Ready for macOS 27: A Step-by-Step Guide to Apple's Next Big Update
- 10 Key Updates in Python 3.14.3 You Need to Know
- Meta Unveils Open-Source AI to Revolutionize U.S. Concrete Production, Slash Reliance on Imports
- Wine 11.8 Brings Enhanced VBScript Support and a Long-Awaited Fix for Microsoft Golf 1999